Structured Analytic Techniques (SATs)
Research Resources
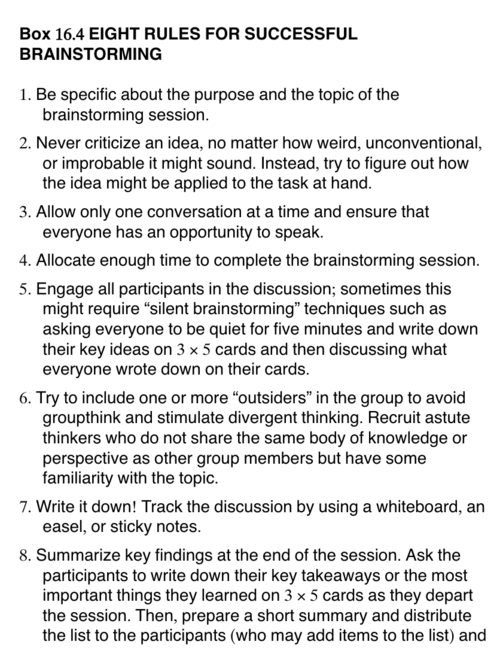
Eight Rules for Successful Brainstorming
Technique Level 1
Technique 1: Chronologies and Timelines
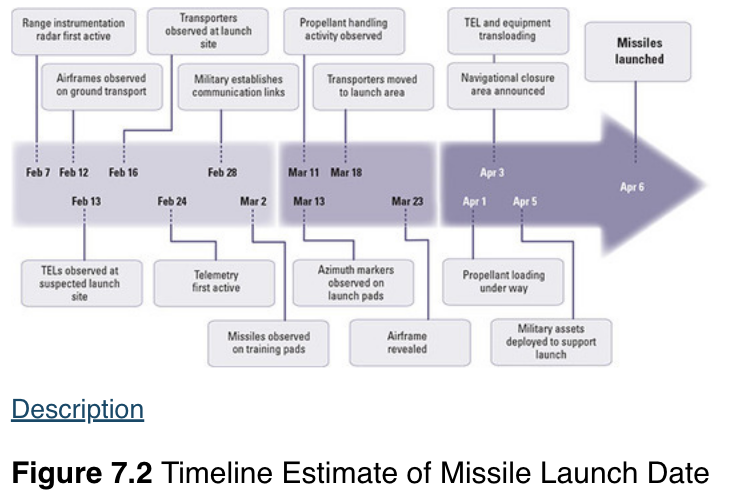 (Pherson and Heuer, 2021, p. 211)
Step-by-Step Guide:
- STEP 1: Identify all key events and arrange them chronologically in a table with one column for the date and one column for the event. (Beebe and Pherson, 2015, p. 159)
- STEP 2: Select relevant information from the event narrative and organize it along the timeline. Can the data be categorized? (Beebe and Pherson, 2015, p. 160)
- STEP 3: Review the timeline by asking questions:
Are assumptions about evidence considered? Does the duration and sequence of events make sense? Are there gaps in the data? Source: (Beebe and Pherson, 2015, p. 160)
Technique 1: Getting Started Checklist
Step-by-Step Guide:
- STEP 1: What prompted the analysis? Is it a report, development, or customer request? (Beebe and Pherson, 2015, p. 110)
- STEP 2: What is the key question that needs to be answered? (Beebe and Pherson, 2015, p. 110)
- STEP 3: Why is the issue important, and how will analysis make a difference? (Beebe and Pherson, 2015, p. 110)
- STEP 4: Has the question been answered before? What has changed? (Beebe and Pherson, 2015, p. 110-111)
- STEP 5: Who are the primary customers? Are their needs clear? (Beebe and Pherson, 2015, p. 111)
- STEP 6: Are there other stakeholders with differing perspectives? (Beebe and Pherson, 2015, p. 111)
Technique 1: Starbursting
Find the template from [MindTools-Starbursting](https://www.mindtools.com/ab1w9zu/starbursting) or [download here](./media/Starbursting.pdf).
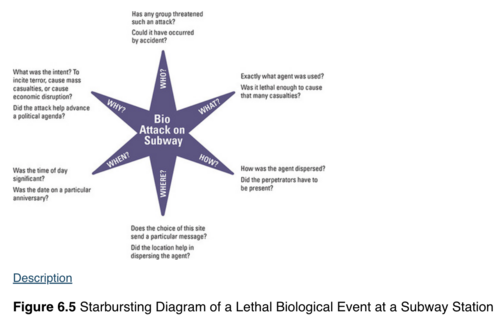 (Pherson and Heuer, 2021, p. 167)
| What? | ||
| Why? | Central Problem/Question | Who? |
| How? | ||
| When? | ||
| Where? | ||
Technique 1: Force Field Analysis
Step-by-Step Guide:
- STEP 1: Define the problem or goal clearly. (Beebe and Pherson, 2015, p. 133)
- STEP 2: Brainstorm the main factors influencing the issue. (Beebe and Pherson, 2015, p. 133)
- STEP 3: Create two lists—one for supporting arguments and one for opposing ones. (Beebe and Pherson, 2015, p. 133)
- STEP 4: Assign values to the arguments to determine their strength. Calculate the total score to determine the dominant side. (Beebe and Pherson, 2015, p. 133)
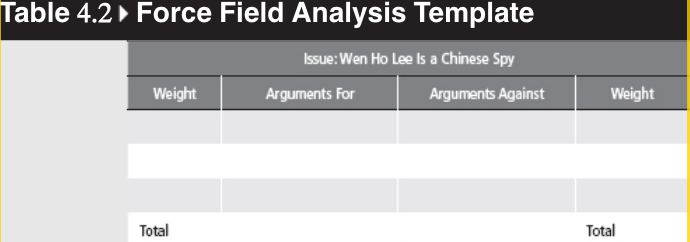 (Beebe and Pherson, 2015, p. 133)
Technique 1: Key Assumptions Check
Step-by-Step Guide:
- STEP 1: Gather a group, including outsiders, to brainstorm assumptions. (Beebe and Pherson, 2015, p. 185)
- STEP 2: List assumptions on a whiteboard and critique them. (Beebe and Pherson, 2015, p. 185)
- STEP 3: Categorize assumptions as supported, uncertain, or unsupported. (Beebe and Pherson, 2015, p. 186)
- STEP 4: Refine the list and update based on group feedback. (Beebe and Pherson, 2015, p. 186)
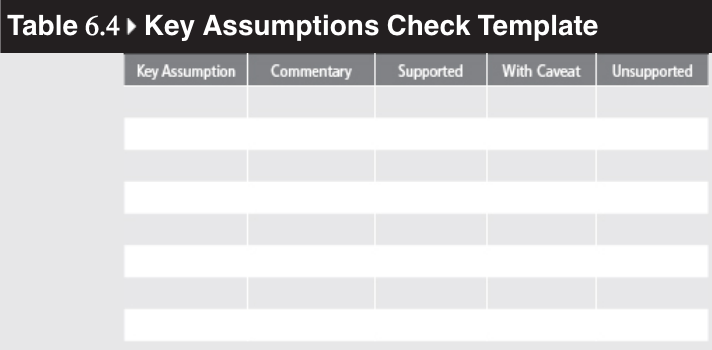 (Beebe and Pherson, 2015, p. 186)
Technique 1: Red Hat Analysis and Structured Brainstorming
- Avoid mirror imaging—assuming others think like you. Red Hat Analysis helps to view problems as others might, particularly adversaries.*
Step-by-Step Guide:
- STEP 1: Gather analysts with knowledge of the target, environment, or decision-makers. (Beebe and Pherson, 2015, p. 323)
- STEP 2: Use sticky notes to brainstorm without discussion. Focus on what the adversary would consider when acting. (Beebe and Pherson, 2015, p. 323)
- STEP 3: Group and analyze ideas for common themes. (Beebe and Pherson, 2015, p. 323)
Technique 1: Structured Brainstorming
Step-by-Step Guide:
- STEP 1: Gather a team of analysts. Use sticky notes for brainstorming, focusing on possible causes or factors. (Beebe and Pherson, 2015, p. 250)
- STEP 2: Post sticky notes on a wall and rearrange them into groups based on similarities. (Beebe and Pherson, 2015, p. 251)
- STEP 3: Analyze themes and draw conclusions for further investigation. (Beebe and Pherson, 2015, p. 251)
Technique Level 2
Technique 2: Deception Detection
Step-by-Step Guide:
- STEP 1: Use deception detection checklists to assess the situation. Consider the motives, past practices, and the source’s credibility. (Beebe and Pherson, 2015, p. 161)
- STEP 2: Analyze deception potential using checklists such as MOM (Motive, Opportunity, Means) and POP (Past Opposition Practices). (Pherson and Heuer, 2021, p. 256)
AI Content Detection
How to detect synthetic content:
- Pay attention to details like hands, faces, lighting, textures, and patterns.
- Use tools like [Wasitai Detector](https://wasitai.com) and [Scribbr AI Detector](https://www.scribbr.com/ai-detector/).
Technique 2: Decision Matrix
Step-by-Step Guide:
- STEP 1: Identify the decision or question. (Beebe and Pherson, 2015, p. 454)
- STEP 2: List criteria and options. Consolidate items to remove overlap. (Beebe and Pherson, 2015, p. 454)
- STEP 3: Assign weights and score options. Calculate the total score and choose the best option. (Beebe and Pherson, 2015, p. 456)
| Decision Matrix: <Decision/Question> | ||||
|---|---|---|---|---|
| Criteria | Weight | Option 1 | Option 2 | Option 3 |
| Criterion 1: | ||||
| Criterion 2: | ||||
| Criterion 3: | ||||
| Criterion 4: | ||||
| Criterion 5: | ||||
| Total Weighted Score: | ||||
| Best Option: | ||||
| ||||
Technique 2: Devil’s Advocacy
- Devil’s Advocacy helps critique decisions or plans by exploring what could go wrong.*
Step-by-Step Guide:
- STEP 1: Start with the project’s goals, assumptions, and gaps. (Beebe and Pherson, 2015, p. 187)
- STEP 2: Build a logical case against the proposed decision by focusing on potential pitfalls. (Beebe and Pherson, 2015, p. 187)
Technique 2: Mind Maps
Step-by-Step Guide:
- STEP 1: Write the focal question at the center of the page. (Beebe and Pherson, 2015, p. 233)
- STEP 2: Brainstorm possible explanations and group ideas into categories. (Beebe and Pherson, 2015, p. 233)
- STEP 3: Expand the mind map by drawing connections between ideas. (Beebe and Pherson, 2015, p. 234)
Technique 2: Morphological Analysis
Step-by-Step Guide:
- STEP 1: Define the problem’s dimensions (group, activity, method, impact). (Beebe and Pherson, 2015, p. 404)
- STEP 2: Combine dimensions to generate alternative scenarios and refine them. (Beebe and Pherson, 2015, p. 404)
Technique 2: Multiple Hypothesis Generation—Simple Hypotheses
Step-by-Step Guide:
- STEP 1: Brainstorm hypotheses. Write them down and consolidate similar ideas. (Beebe and Pherson, 2015, p. 207)
- STEP 2: Clarify each hypothesis using Who, What, When, Where, and Why. (Beebe and Pherson, 2015, p. 207)
- STEP 3: Select the most promising hypotheses for further analysis. (Beebe and Pherson, 2015, p. 207)
| Multiple Hypothesis Generation Table: <Objective/Problem> | |||||
|---|---|---|---|---|---|
| Hypothesis | Who | What | When | Where | Why |
| Hypothesis 1: | |||||
| Hypothesis 2: | |||||
| Hypothesis 3: | |||||
| Hypothesis 4: | |||||
| Hypothesis 5: | |||||
| Selected Promising Hypotheses for Further Analysis | |||||
| |||||
Technique 2: Pros-Cons-Faults-and-Fixes
Step-by-Step Guide:
- STEP 1: Define the decision clearly. (Beebe and Pherson, 2015, p. 277)
- STEP 2: List pros and cons, and develop fixes for the cons. (Beebe and Pherson, 2015, p. 277)
- STEP 3: Compare the pros and cons, and assess the risk associated with each. (Beebe and Pherson, 2015, p. 278)
Technique 2: What If? Analysis
Step-by-Step Guide:
- STEP 1: Assume the event has occurred and develop a chain of reasoning for how it happened. (Beebe and Pherson, 2015, p. 350)
- STEP 2: Rank scenarios based on severity and probability. (Beebe and Pherson, 2015, p. 351)
Technique Level 3
Technique 3: Analysis of Competing Hypotheses (ACH)
Step-by-Step Guide:
- STEP 1: List hypotheses to be considered. (Beebe and Pherson, 2015, p. 209)
- STEP 2: Assess information for consistency with each hypothesis. (Beebe and Pherson, 2015, p. 209)
- STEP 3: Refine hypotheses and conclusions based on inconsistencies. (Beebe and Pherson, 2015, p. 210)
| Evidence/Arguments | Hypotheses To Be Compared | ||||
|---|---|---|---|---|---|
| Hypothesis 1 | Hypothesis 2 | Hypothesis 3 | Hypothesis 4 | Hypothesis 5 | |
| Evidence/Argument 1 |
Template loop detected: Template:Yes
|
Template loop detected: Template:No
|
Template loop detected: Template:Neutral Neutral Neutral |
Template loop detected: Template:Yes
|
Template loop detected: Template:No
|
| Evidence/Argument 2 |
Template loop detected: Template:Neutral Neutral Neutral |
Template loop detected: Template:Yes
|
Template loop detected: Template:No
|
Template loop detected: Template:No
|
Template loop detected: Template:Yes
|
| Evidence/Argument 3 |
Template loop detected: Template:No
|
Template loop detected: Template:Neutral Neutral Neutral |
Template loop detected: Template:Yes
|
Template loop detected: Template:Yes
|
Template loop detected: Template:No
|
| Evidence/Argument 4 |
Template loop detected: Template:Yes
|
Template loop detected: Template:Yes
|
Template loop detected: Template:Neutral Neutral Neutral |
Template loop detected: Template:No
|
Template loop detected: Template:Neutral Neutral Neutral |
| Evidence/Argument 5 |
Template loop detected: Template:No
|
Template loop detected: Template:Neutral Neutral Neutral |
Template loop detected: Template:Yes
|
Template loop detected: Template:No
|
Template loop detected: Template:Yes
|
| Total Inconsistencies | X | Y | Z | A | B |
| Tentative Conclusion | The hypothesis with the fewest inconsistencies is the most likely. | ||||
File:Media/Figure 7.6A Creating an ACH Matrix.png (Pherson and Heuer, 2021, p. 245)
Technique 3: Strengths-Weaknesses-Opportunities-Threats (SWOT)
Step-by-Step Guide:
- STEP 1: Define the objective clearly. (Beebe and Pherson, 2015, p. 188)
- STEP 2: List strengths, weaknesses, opportunities, and threats. (Beebe and Pherson, 2015, p. 188)
- STEP 3: Identify strategies for exploiting strengths and opportunities, and mitigating weaknesses and threats.
File:Media/figure-10.4-swot-analysis.png (Beebe and Pherson, 2015, p. 188)
| SWOT Analysis: <Objective> | |
|---|---|
| Strengths | Weaknesses |
|
|
| Opportunities | Threats |
|
|
| Strategies for Action | |
|
Exploiting Strengths & Opportunities:
Mitigating Weaknesses & Threats:
| |
Technique 3: Foresight Quadrant Crunching
Step-by-Step Guide:
- STEP 1: Break the lead hypothesis into component parts and identify critical dimensions. (Beebe and Pherson, 2015, p. 354)
- STEP 2: Use 2x2 matrices to generate alternative scenarios. (Beebe and Pherson, 2015, p. 354)
File:Media/table-13.3.png (Beebe and Pherson, 2015, p. 354)
Technique 3: Indicators
Step-by-Step Guide:
- STEP 1: Brainstorm indicators for each scenario. (Beebe and Pherson, 2015, p. 328)
- STEP 2: Refine the indicators, ensuring they are observable, valid, reliable, and stable. (Beebe and Pherson, 2015, p. 328)
Technique Level 4
(To be expanded)
Technique Level 5
(To be expanded)
References
Cite error: <ref> tag with name "BeebePherson2015" defined in <references> is not used in prior text.
Cite error: <ref> tag with name "PhersonHeuer2021" defined in <references> is not used in prior text.
